For the longest time, I have dreamed of a remote access solution for my homelab. Though, it was more of a nice-to-have rather than a necessity for quite some time as I was only hosting a handful of services that were rather inactive back then. As such, I only researched and drafted a couple implementation ideas using Cloudflare Tunnel, ZeroTier, and Tailscale, but no real execution was done.
After the recent deployment of my website, I figured now’s the time for a change as I plan to host more internet-facing applications in the future. This article will walk through the steps that I took to install Tailscale on an LXC container running Alpine Linux within my homelab.
Why Tailscale?
After much deliberation, I chose Tailscale to be my remote access solution. The reason is simple, although I enjoy learning to host various services, I also prefer to keep things straightforward. This is especially so for security-related services as in the case of Tailscale. Hence, Tailscale ticks all the boxes for my use case as it’s easy to deploy and maintain which saves me a lot of headaches down the road.
Likewise, ZeroTier is similar in the aspect of ease of use, but I prefer Tailscale’s UI. Alternatively, Cloudflare Zero Trust offers comparable services like Cloudflare Tunnel and WARP Connector but they differ in functionality. Cloudflare Tunnel exposes outbound-only traffic from the private server to Cloudflare, and users will need to authenticate with Cloudflare for access. On the other hand, Cloudflare WARP Connector is equivalent to a conventional VPN that allows for site-site or user-to-site access to a private network. However, Cloudflare WARP is objectively more complicated to setup as compared to Tailscale. Therefore, I chose to give Tailscale a shot as it looks pretty good on paper.
Proxmox
Moving on to the actual setup process, I created a LXC container on Proxmox that was installed with Alpine Linux, a minimal, security-oriented Linux distribution that works really well with containers and servers. It’s also only a few megabytes in size which is perfect for my budget homelab with extreme space constraint.
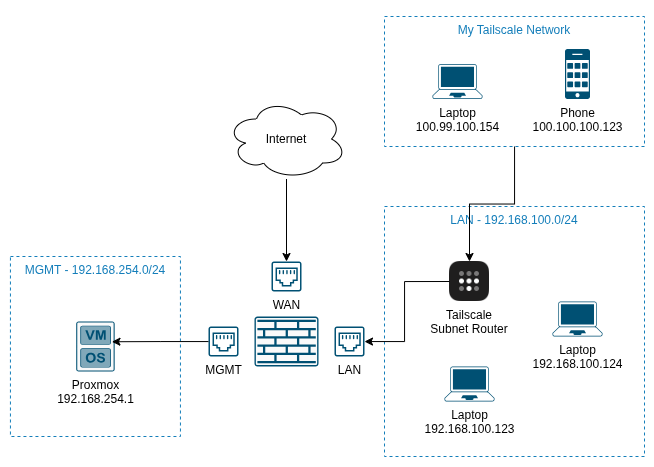
My home network setup is trivially segmented into a few subnets, featuring a DMZ, LAN, and MGMT. In this case, I attached the LAN network adapter to the container and configured the proper IP address and gateway such that it is in the LAN subnet. Security-wise, this isn’t the best idea as I figured it’d be better to have a separate subnet just for the VPN via VLAN tagging. This enables granular control over VPN traffic via stricter, fine-grained firewall rules as compared to lumping everything in LAN.
After that comes booting up the container to install Tailscale, but before that, the following lines will need to be added to the config file of the container at /etc/pve/1xx.conf if it’s unprivileged (recommended):
lxc.cgroup2.devices.allow: c 10:200 rwm
lxc.mount.entry: /dev/net/tun dev/net/tun none bind,create=file
The aforementioned lines enable Tailscale’s access to the /dev/tun device, which will be used by Tailscale to create a virtual network adapter (see here for more details).
Alpine
Once Proxmox has been setup, it’s time to install tailscale on Alpine and configure it to run on startup. Since tailscale is already a package on Alpine’s community repository, it can be installed through Alpine’s package manager, apk.
Pre-install
Before installing any packages, it’s best to perform a full system update:
apk update # update repository index
apk add --upgrade apk-tools # upgrade apk package manager
apk upgrade --available # upgrade all packages
Once the full system update has completed, reboot your system:
sync
reboot
To enable Alpine’s community repository:
setup-apkrepos -cYou should be able to see the URL of the community repo in the /etc/apk/repositories file:
https://dl-cdn.alpinelinux.org/alpine/v3.22/main
https://dl-cdn.alpinelinux.org/alpine/v3.22/community
Installing Tailscale
After which, install tailscale:
apk add tailscaleSince Alpine Linux uses OpenRC instead of systemd for its init system, enable and start tailscale as follows:
rc-service tailscale start
rc-update add tailscale default  # run on startup
Now, you may authenticate your tailscale client with your network:
tailscale upSubnet Router
Subnet router enables a Tailscale client to access devices on different subnets. For instance, I want to remotely access services in my MGMT subnet but I do not want to go through the hassle of installing tailscale on all devices within that subnet. As a result, I can simply setup a Tailscale subnet router in my LAN, enable IP forwarding, and lastly, advertise routes to the MGMT subnet. This will enable Tailscale clients to connect to devices within the advertised subnets as seen below:
IP Forwarding
IP forwarding transforms the Alpine Linux container into a router, thereby allowing it to forward traffic from Tailscale’s network to any advertised private subnets. In my case, it forwards network packets from the tailscale0 interface to the eth0 interface, which will then send the traffic to the LAN interface of my router and lastly, to its MGMT interface.
On Alpine Linux, enable IP forwarding by executing the following commands:
echo 'net.ipv4.ip_forward = 1' | tee -a /etc/sysctl.d/99-tailscale.conf
echo 'net.ipv6.conf.all.forwarding = 1' | tee -a /etc/sysctl.d/99-tailscale.conf
sysctl -p /etc/sysctl.d/99-tailscale.conf
The aforementioned configuration may be persisted across reboots by executing the sysctl command on startup using the following script:
#!/bin/sh
sysctl -p /etc/sysctl.d/99-tailscale.conf
The script as shown above is to be added to the /etc/local.d directory which allows the script to be executed by the local service on startup. The local service may be enabled as follows:
rc-update add localAdvertise Routes
With IP forwarding successfully enabled, the tailscale client may now be configured to advertise the relevant subnets. In my case, I will advertise the MGMT subnet by specifying the network address and prefix:
tailscale set --advertise-routes=192.168.254.0/24After all the configuration, it’s time to test out the VPN by simply sending ICMP probes to devices within the private subnet from any device connected to the Tailscale network. If it’s not working, try to check if there’s any firewall rule blocking ICMP or traffic between subnets. With traceroute, network traffic could be observed going through the subnet router and then, the destination:
traceroute to 192.168.254.1 (192.168.254.1), 30 hops max, 60 byte packets
 1  subnet-router.ts12345.ts.net (100.100.100.134)  37.784 ms  37.748 ms  37.743 ms
 2  192.168.254.1 (192.168.254.1)  37.738 ms  66.507 ms  66.517 ms
Lastly, key expiration should be disabled on Tailscale’s web console. Otherwise, upon restarting the Alpine container, the tailscale client will require re-authentication and thus, disrupting remote access.
Conclusion
All in all, Tailscale is an amazing service with a generous free tier that offers a rather quick and painless process to setup a VPN for remote access.